By using vendor records in Quickbooks you have the ability to keep track of all your vendor transactions as well as make notes about each vendor. Your notes may be used as a reminder if your give a vendor a discount, write a check, or if the vendor pays on time. All this information will be stored in your Quickbooks vendor files. It’s important to have written documentation because, let’s be honest, most of us just can’t remember every detail of every transaction all the time. Making notes for each vendor can be right at your fingertips and easy to find when you need a reminder.
Using vendor records will also make things much simpler to keep track of the vendors that provide you with the things that keep your business running smoothly such as, office supplies, equipment, or parts. After you have built up your vendor records you will not only be able to use the records as a reference, but also for transactions and reports.
If you are already a user you might consider adding information to your vendors if you haven’t already. If you are a new user, when you set up your program you will be asked to enter vendor details in the record template so this is a good time to add any helpful notes.
Filling in Vendor Fields
You can create a vendor record by opening up the Vendor menu and select Vendor Center. Above the tabbed table, on the small toolbar, open the New Vendor menu and click on New Vendor. A window like the one below will open.
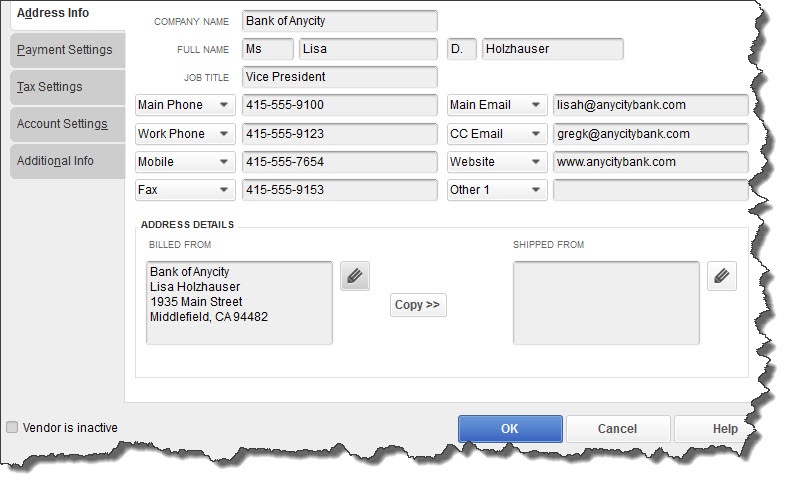
You can store detailed information about your vendors in these record templates.
At the top of your screen is a box labeled Vendor Name. Enter the vendors name and move to the Opening Balance field and supply the amount and the date. If you are not sure about the concept of opening balances, we can review this with you.
After filling in as many fields as you can, go to the toolbar on the left and click on the Payment Settings tab. These fields are optional – Payment Terms, Credit Limit, etc. but you should complete any information that you have access too. Much of this information comes up automatically when you create transactions so the more information you add now the less you will need to add later.
Other tabs shown here open windows where you can specify:
- Tax Settings. Vendor Tax ID and 1099 eligibility.
- Account Settings. You can select the default account that should be automatically selected when you enter a bill or expense for this vendor (for example, phone bills=Utilities: Telephone). Talk to us if you don’t understand this. It’s OK to leave it blank for now.
- Additional Info. Vendor Type (subcontractors, for example) and Custom Fields (fields you can define for your own use).
When you’re work is done, click OK.
Viewing Your Records
After you have created your vendor records, the Vendor Center will display a list of your vendors in its left pane. You can highlight a vendor by clicking on it. You see something like the image below in the right pane.

The Vendor Information window displays contact information in the top pane (not pictured here), and additional details listed below.
This is where your meticulous work creating records starts to pay off. Click on any of the five tabs in the top toolbar to display that vendor’s Transactions, the Contacts from that company, any related To Do’s, Notes you’ve added, and Sent Email. Once your lists grow unwieldy, you can search by a variety of filters.
Using Records in Transactions
There are numerous transaction types that require vendor information, such as; purchase orders, bills, checks, and sales tax payments. When you open one of these transaction forms and click the down arrow in the Vendor field, your list will drop down. Select one, and related details that you’ve already entered will automatically appear in the correct fields.
You can create vendor transactions from either the home page or the menus. You can also do this from the Vendor Center. With either the Vendors or Transactions tab active, you’d click on the New Transactions link in the upper toolbar and select the one you want to launch.
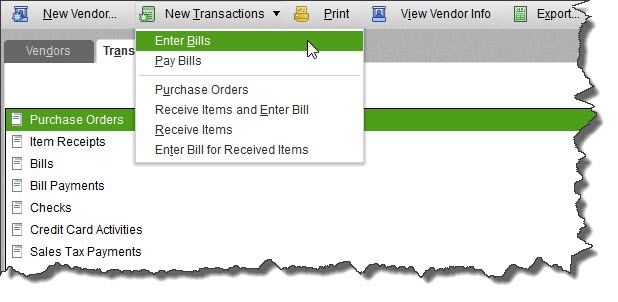
QuickBooks provides numerous paths to creating vendor-related transactions.
The mechanics of filling in the fields in vendor records and using that information in transactions are not too complicated. However, you may run across unfamiliar concepts. At Summit CPA we offer QuickBooks consultation. If you would like further information on how we can assist you with your bookkeeping needs, contact our office at 866-497-9761 to schedule an appointment with our Virtual CFO.
.png?width=120&height=77&name=Summit-Virtual-CFO_color_rgb%20(1).png)


