.png?width=120&height=77&name=Summit-Virtual-CFO_color_rgb%20(1).png "Summit-Virtual-CFO_color_rgb (1)")


If there is one or more people other than yourself, adding data to your QuickBooks, you need to know how to set up accounts for each of the other employees.
Why?
Your QuickBooks files contain a lot of sensitive customer and employee data that you do not want to fall into the wrong hands. Such as; credit card number and social security numbers. Clearly you trust your employees or you wouldn’t have hired them. However, for security reasons, you will want to execute every safeguard available to you.
QuickBooks, allows you stay safe by limiting the access that other users have to your company files.
Here’s how it works.
To begin, go to the upper right corner, click on the gear icon, and select Manage users. As the Master Administrator, you should be listed here. Then click Add user. When the screen opens, from the list of 4 you will be ask to select the type of user you want to add such as:
- Standard user. You can assign full or limited access to standard users, but they won’t have administrator privileges.
- Company admin. At this level, the user can see and do everything.
- Reports only. These individuals have access to all reports except those that contain payroll or contact information.
- Time tracking only. You’d assign this type to employees who only need to enter their own timesheets.

The 1st step in adding a user in QuickBooks is to specify their type.
The first two count toward your user limit, but the second two do not. Make your selection and click Next. We’ll select standard user for this example.
On the screen that opens, you’ll be assigning actual access rights, telling QuickBooks what the user’s restrictions are. You can choose one of the following: All (with or without payroll access), None (allows some activities) or Limited. Select Limited, and click on the box in front of Customer to create a check mark. Here, you’ll see the list of specific actions that each individual can take (like creating invoices, sales receipts, and statements) and the screens that they can see (customer registers and reports, tax rates and agency settings, etc.).
You will also see a list of what they cannot do, including printing checks, viewing bank registers, and preparing a sales tax return.
Click on the box in front of Customer again to uncheck it and select Vendor. You’ll see a similar list here of what your new user can and cannot do, only its activities relate to your accounts payable.
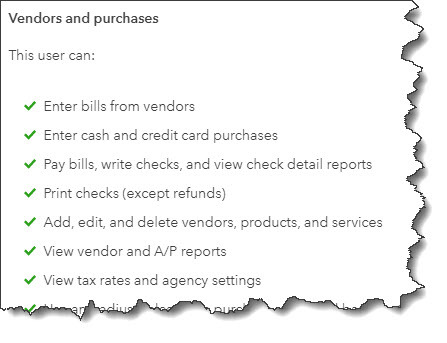
Here you will find lists in QuickBooks of what standard users can and cannot do and see for both customers and vendors.
Then, click Next if the user will be entering his or her own timesheets in QuickBooks, then click the button in front of Yes, and select the correct name from the drop-down list. Click Next. Answer the user settings questions on the next screen and click Next. Enter the user’s name and email address (user ID), then click Save. QuickBooks will return you to the Manage Users screen, where you’ll see that your new user has been added to the list. The individual you just invited will receive an email invitation with instructions on how to set up an account.
More Security Tips
There are other ways you can keep all of your company’s data safe. Here are some suggestions to consider:
- Always update your operating system and applications when prompted. These often contain security patches in addition to bug fixes and new features.
- Keep backups out of reach of others. Cloud backups are best, but if you use a local device, don’t leave it out in the open.
- Log out of QuickBooks when you’re not at your desk.
- Shred anything you print from QuickBooks or store it in a locked drawer.
- Protect your networks. Discourage excessive web browsing by employees. Don’t allow extraneous app downloading on company equipment and ask employees not to use company mobile devices on public networks. Consider network monitoring software if you can’t afford managed IT.
Applying safeguards proactively will help keep your data safe and prevent data theft that can be nearly impossible to recover from.

At Summit CPA we offer QuickBooks consultation. If you would like further information on how we can assist you with your bookkeeping needs, contact our office at 866-497-9761 to schedule an appointment with our Virtual CFO.