.png?width=190&height=122&name=Summit-Virtual-CFO_color_rgb%20(1).png "Summit-Virtual-CFO_color_rgb (1)")


When you are trying to make a pitch to sell your products or services estimates, quotes, or bids can be very useful tools.
Estimates are standard practice for most businesses. After all, you wouldn’t think of having a home or auto repair without an estimate first. Most of us want to know what the cost will be up front.
An estimate doesn’t have to be a formal document. You can write an estimate for your product or service on a napkin and have your customer sign it. That said, the quality of your sales documents reflect your business’ image and professionalism.
Using QuickBooks tools to manage your selling process enables you to create detailed estimates that can easily be converted to invoices when you get an approval. By using QuickBooks reports, you can monitor the progress of your quotes. Here is how it works.
A Dedicated Form
You likely already know how to how to create an invoice, so you shouldn’t have an issue generating because the forms are very similar. Start by clicking the + (plus) sign in the upper right corner of the screen. In the Customer column, click on Estimates. A form like the one below will open.
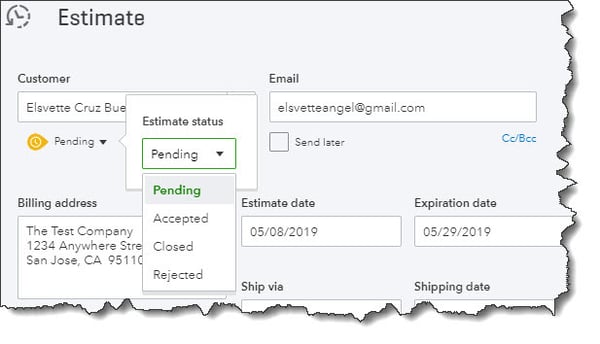
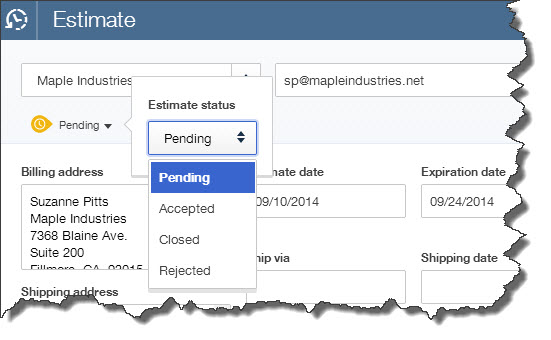
QuickBooks provides a form template for your estimates.
Open the drop-down list in the Customer field and select the correct one (or +Add new). Note: When you click on +Add new, it’s only necessary to enter a prospective customer’s name to create an estimate. Contact details will not appear on the form. However, you can go back later and complete a customer’s record, though it’s a good idea to at least enter an email and physical address. Click +Details to open the complete record, then save what you entered there.
Below the Customer field, the word “Pending” should appear. This is in reference to the status of your estimate. Next click the down arrow to the right of it and then the down arrow in the small window that opens to see what options you’ll have later. If you wish to copy another person on the estimate, click the small Cc/Bcc link to the right and provide the email address(es).
Enter (or select by clicking on the calendar graphic) the Estimate date. When an offer is only good for a limited time period, enter an Expiration date, if not leave the field blank. Next, go down to the Product/Service grid and select the items that you’re providing an estimate, one on each line. Fill in the Qty field and check the labeled box if the item is taxable.
If you have already created a product record, the other fields should be automatically completed. If you have not created a product record, click +Add new. The Product/Service information pane should slide out from the right side of the screen. Once again, you’re only required to enter a Name, but you should really create the whole record and save it to return to the estimate.
If you want, you can add a discount to the estimate either as a dollar amount or a percentage in the lower right corner of the screen. Here you may also edit the customer message that appears in the lower left and attach any necessary files. When you are done, save the estimate.
Estimate Options
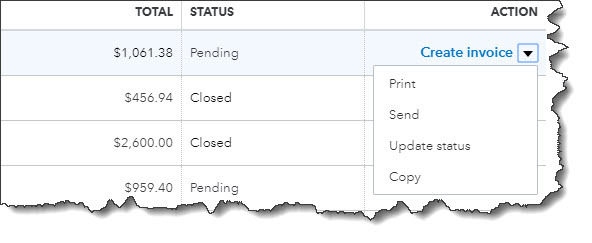
You can work with your estimate from the Sales Transactions screen.
If you’re not already there, click the Sales link in the left vertical toolbar, and then the All Sales tab and the Estimates bar. Find your estimate and look at the end of the row, in the Action column. If you want to convert your estimate to an invoice, click Create invoice. In the window that opens, indicate whether you want to invoice:
- A percentage of each line item,
- A custom amount for each line, or,
- The total of all lines.
Review your invoice when it opens. Next, complete any other fields necessary, and save it. Your estimate’s status has now been changed to Closed, and the new invoice created from it will appear on the Sales Transactions screen. It will also be included in the Estimates By Customer report.
If you’re able to create an invoice then you can create an estimate too. If you need to amend an estimate or alter it and resubmit it, it could be a little tricky. At Summit CPA we offer QuickBooks consultation. If you would like further information on how we can assist you with your bookkeeping needs, contact our office at (260) 497-9761 to schedule an appointment with our advisors.


Leave a comment