.png?width=190&height=122&name=Summit-Virtual-CFO_color_rgb%20(1).png "Summit-Virtual-CFO_color_rgb (1)")


The lifeblood of a company is their customers. Quickbooks Online you can help you manage and maintain those customer relationships. Here’s how.
Those who have been in business for a long time may remember the days that you had to do your bookkeeping manually. You likely used a lot of post-its, folders, card files, etc. Especially if you accidentally lost or misplace one of those post-its. Tracking your customers could be a real pain. What a nightmare, huh?
No matter if you were super organized, files get lost or misfiled from time to time. It was tough to keep up with and store all those files too. It was especially irritating if a customer called in with questions about their account or if you had cash flow problems and couldn’t find your invoices, statements, or even payments. I bet you don’t miss those days.
Luckily we have QuickBooks Online to keep the books organized and it saves on a lot of paper and storage too. Have you taken the time to explore all the customer relationship management tools that are available in QuickBooks Online? For instance:
Thorough Records
A comprehensive set of individual profiles is the core of any good customer tracking system. Using QuickBooks Online you have thorough and flexible record templates. Just click Sales in the main toolbar, then click the Customers tab at the top of the screen. To create a new customer record, click New Customer off to the right to open the Customer Information window.
Note: If you have your customer database in an existing Excel or .CSV file, you should be able to import it. QuickBooks Online provides instructions for this.
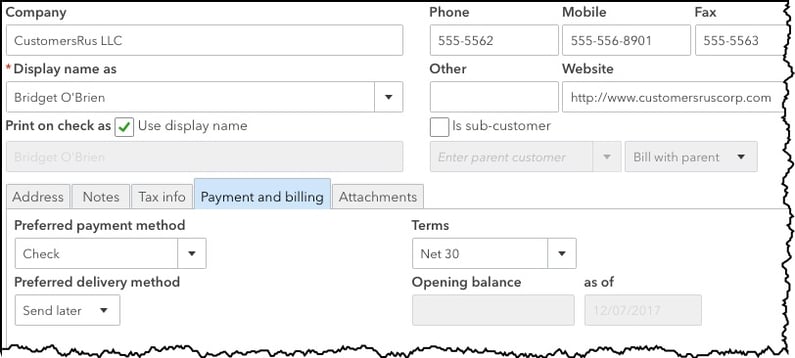
You can create a profile for each customer in the Customer Information window.
In this area you will need to enter a lot of information, mostly customer contact details. When you see a down arrow next to a field, it indicates that there is a drop-down list option available.
In the lower left quadrant of the screen there is a series of tabbed information windows. By clicking on each window to enter your customer’s information.
*Address- both billing and shipping.
*Notes- any information you have to enter.
*Tax information- exemption details and default tax code (if taxable)
*Payment and billing- preferred payment and delivery method, payment terms, and opening balance.
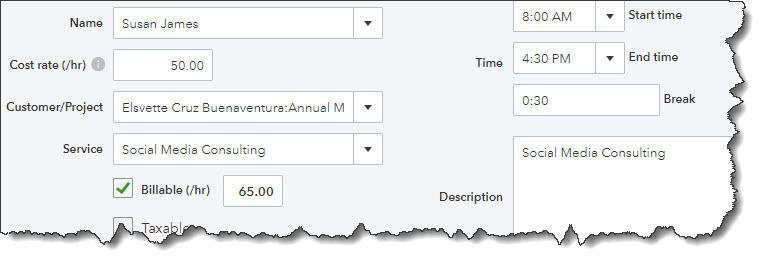
*Attachments- All files that pertain to this customer you wish to include.
When you’re finished, click Save. Your new record will appear in your list of customers. You’ll be able to toggle back and forth between the details you just entered and a list of their transactions.
Working with Customers
You can add new customers as needed, however, it’s a good idea to enter records for all of your customers before you start creating transactions. It will save time down the road, and their accessibility will help with other accounting tasks.
When you click on Sales | Customers now, you’ll see something like this:
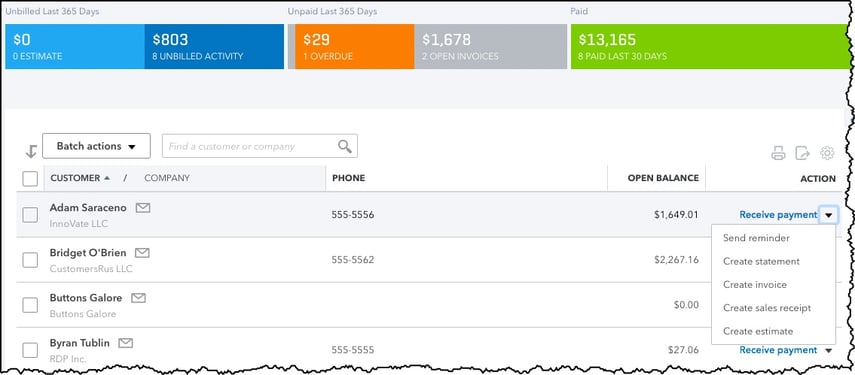
Your Customers page contains a list of customers with links to related activities. It also provides a color-coded row of bars that represent the status of invoices and estimates.
The Customers page consists of many elements. The main section displays a table of your customers. Click on one to open the page containing the Transaction List and Customer Details.
On this screen, though, you’ll only see columns for Customer/Company, Phone, Open Balance, and Action by default; click the gear icon in the upper right if you want to include more columns here. When you click on the down arrow next to a field in the Action column, a drop-down list will display the options available for that customer, like Receive payment, Send reminder, and Create Statement.
A series of colored bars runs across the top of the screen. Each represents the current status of a specific transaction type: Estimates, Unbilled Activity, Overdue, Open Invoices, and Paid Last 30 Days. Click on any of these to open a list of pertinent transactions.
You can do all of these activities elsewhere in QuickBooks Online, but the fewer clicks, the better. It’s convenient to be able to work directly from the Customers screen, too.
You can do a lot of your sales tasks by accessing the Customers page. Click the Sales icon in the navigation bar. For a quick look at the status of your sales transactions, click Sales | Customers.
The site was built for use by business managers, not accountants, but it can still be a little daunting at first. At Summit CPA we offer QuickBooks consultation. If you would like further information on how we can assist you with your bookkeeping needs, contact our office at 866-497-9761 to schedule an appointment with our Virtual CFO.


Leave a comment